Sunday, October 12, 2008
Flowers n Stems
Photobucket


Supplies: Download Here

I've supplied several different flower heads and stem pieces in the zip above, as well as, several paper swatches for you to use, but feel free to use your own.


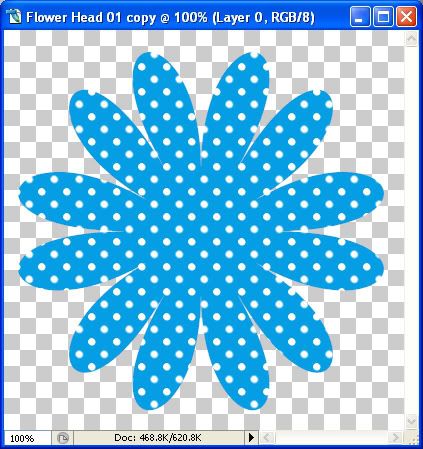
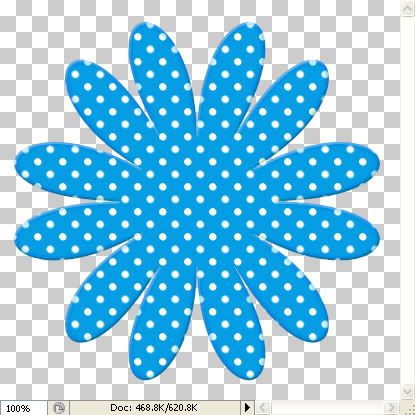
1. Open up one of the flower heads from the supplies zip. I'm going to be using flower head 01 for this tutorial.

2. Go up to the Image tab and choose Duplicate, duplicate it again because we need 2 copies of this, then close out our original.

3. Open up a paper swatch from the zip file or use one of your own. I'm going to be using flower head paper 01.

4. Click on your Mover tool on the left, then in the layer palette, put your cursor on the ICON of the paper swatch and drag it over onto your flower head.

* You should have your paper swatch on top of your flower head in the layer palette.

5. Close out the paper from the zip, we no longer need it.

* Now, we are going to create what is called a Clipping Mask. It's going to mold the paper to the flower layer that is below it.

6. Make sure the paper layer is highlighted blue in the layer palette, hold down your Ctrl key on your keyboard, hold down your Alt key on your keyboard and then hit the g key.

* If you did it correctly, your flower shape now has the paper molded to it

Photobucket

7. Right click on one of the layers in the layer palette and choose merge visable.

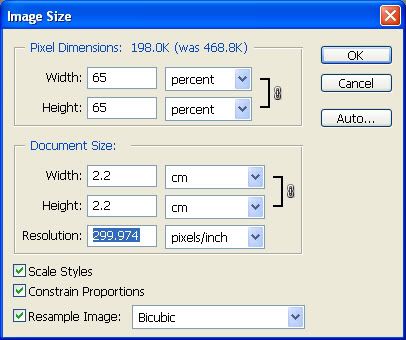
* Now we need to make the second black flower for the middle of this one smaller.

8. Click on your black flower to make it active, then go up to the Image tab at the top of your screen. Click on Image Size and put your settings like in the picture below:

Photobucket

9. Open up flower head paper 04. Since we resized the flower to 65% of it's original size, let's do the same for the paper so that our design isn't too big.

10. Duplicate the paper layer ( image tab, image size, use same settings in above pic).

11. Click on your Mover tool and drag the paper over and onto your black flower canvas. Repeat step #6 to get the clipping mask for this flower.

12. Right click on one of the layers in the layer palette and Merge Visable.

13. Close out your resized paper layer.

* Now, let's give these 2 layers a flat bevel by using our layer style options. I have included the layer style in the supplies folder.

14. Click on your Blue flower layer in the palette to make it active. On the far right of your screen, you will see your Styles box. Click on the Styles tab if it isn't showing.

Photobucket

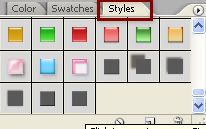
15. In my supplies folder, you will see SK Flower Head Blue for tut.asl, drag that into a blank space in your styles box. It should appear with all the other small square icons in there.

16. Now all you do is click on it and the bevel will appear on your blue flower. It should look like this:

Photobucket

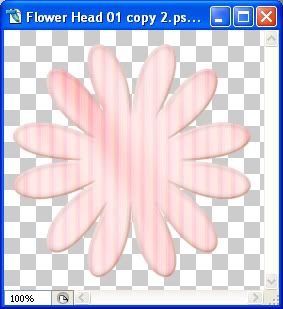
17. Click on your smaller pink flower canvas to make it active. Then click on the same layer style as you did for the blue flower.

* You will notice that there is a blue outline to your pink flower now. Because this flower is so much lighter than our blue one, we need to go in and change the colours so....

18. At the bottom of your layer palette, you will see the Layer Style icon. It looks like a circle with an f in it. Click on that to bring it up and then click on Bevel and Emboss.

19. Leave everything as it is except click on the colour box at the bottom besied Hard Light. Change the colour number to 675847.

20. Now click on Inner Glow and click the greyish brown colour box under Noise and change the colour number to 6b6460 and click OK. Yours should look like this:

Photobucket

* We are going to drag our small pink flower on top of our larger flower, but we need to merge the layer style with it's flower first.

21. In the layer palette, on your flower layer, you will see the layer style icon (a circle with an f in the middle). Right click on the icon and from the flyout choose Create Layers.

22. Right click on one of the layers and choose Merge Visable.

23. Click on your other flower and do the same to it.

24. Now click on your Mover tool and drag the smaller flower on top of your larger flower.

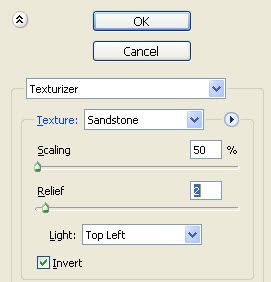
25. I want to rotate my pink flower a little bit so hold down the Ctrl key and hit the letter t on your keyboard.

26. You'll see a bounding box over your canvas. Hold your cursor above the top right corner of the bounding box untill you see a bent double arrow. Then, just drag downward to rotate it as much as you want. When done, hit the Enter key on your keyboard.

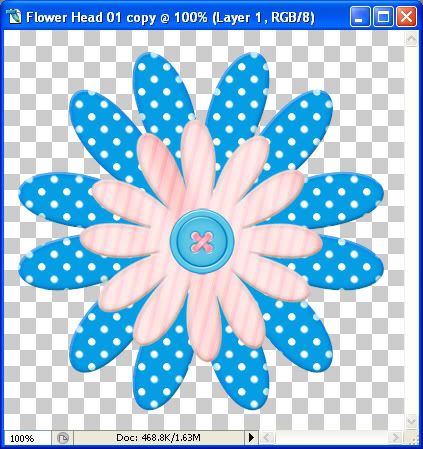
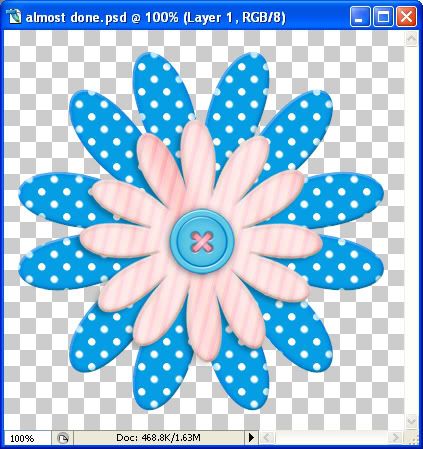
* I've chosen to put a button in the middle of my flower, you can put a bow, bead, or anything you choose. The buttons can be found in my Little Girl at Heart kit on my blog HERE. Here's what mine looks like so far:

Photobucket

* Now we need to make the stem.

27. Open up a new transparent image that is 500 pixels wide by 800 pixels long.

* In the bottom left corner of your new canvas, change 66.7% too 100% and move the canvas to the top of your screen and drag it out untill you can see the whole canvas.

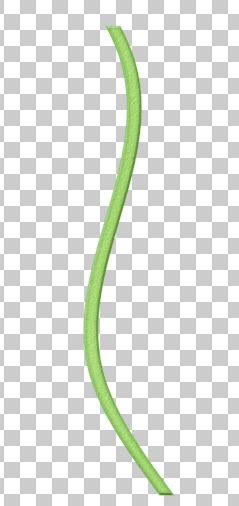
28. From the supplies folder, open up SK Stems.png

29. Click on your Rectangular Marquee Tool and draw out a rectangle over one of the stems that you want to use. I've chosen the 3rd one.

30. Go up to the Edit tab and choose Copy, then click on your new canvas and go up to the Edit tab again and click Paste. Close out the stem png file.

* Use your Mover tool to shift the stem down on the page.

31. Open up one of the green stem papers from the supplies folder. I'm going to be using sk stem paper 01.

32. With your Mover tool, drag it onto our stem canvas. Don't close it out yet. We need it for the leaves too.

* This is optional, but I'm going to put a small texture on my green paper.

33. Go up to the Filter tab and then down to Texture and choose Texturizer, and change your settings to the same as the picture below:

Photobucket

34. Mold your paper layer with your black stem layer by holding down the Ctrl key and the Alt key and then hit the g key on your keyboard.

35. Right click and Merge Visable your 2 layers.

36. Give it the same Layer Style as you gave the flowers by clicking on it in the Styles box.

37. Again, we need to change the colours, so in the Inner glow section, I changed the colour to a dark green 3a5f37, lowered the Opacity to 42%, and changed the Size to 6. In the Bevel and Emboss section, I left everything the same except I changed the colour to a dark brown 3c2e20. Here's what I ended up with:

Photobucket

* Now we are going to do the leaves, but since we are going to use the same colours and bevel as we did on the stem, I'm just going to copy the layer style to my clipboard, cause i'm feeling lazy and don't wanna redo them separately.

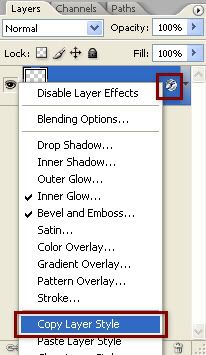
38. In the layer palette, right click on the icon at the end of your layer and choose Copy Layer Style.

Photobucket

39. In the layer palette again, right click on the icon and choose Make Layers, then Merge Visable all your stem layers.

40. Open up a leave from the supplies folder. I'll be using leaf 01.

41. Duplicate it and close out the original.

42. It's a bit big for our flower so go up to the Image tab at the top and choose Resize and resize it by 50%.

43. You still have your green paper open from earlier, so drag it onto your leaf canvas and put the same texture on it from Step #33.

* Close out the green paper swatch.

44. Hold down the Ctrl and Alt key and hit the g key on your keyboard.

45. Merge Visable those two layers.

46. Right click on the leaf layer in the layer palette and choose Paste Layer Style.

* Your leaf should now have the same bevel as your stem.

47. Right click on the icon at the end of your leaf layer and choose Create Layers, then Merge Visable the leaf layers.

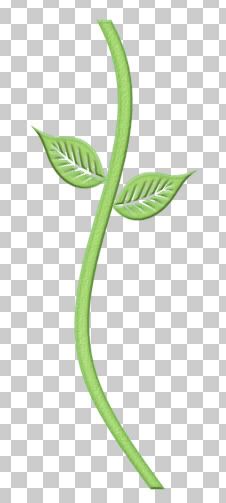
48. Drag one leaf onto your canvas and position it touching the stem. You can hold your cursor above the bounding box till you see the bent double arrow to rotate it how you want it. Use your arrow keys on your keyboard to nudge it into place.

49. Drag another leaf onto your stem canvas. Go up to the Edit tab, then to Transform, then down to Flip Horozontal and this will mirror your leaf. Rotate and nudge your leaf into place. Here's mine so far:

Photobucket

50. Right click and merge visable your leaves and stem.

* We haven't yet put any drop shadows on our flower layers to separate them, so let's do that now.

51. Click on the pink flower in the layer palette to make it active. Click on the Layer Style icon at the bottom of the layer palette and choose Drop Shadow.

* I left everything at it's default settings, but turned down the opacity to 28%. Click OK.

52. For the drop shadow on the button, leave it at it's defaults but change the opacity down to 52, distance to 1, and size to 9 and hit OK. Here's what mine looks like now:

Photobucket

53. Right click in the layer palette and Merge Visable your layers.

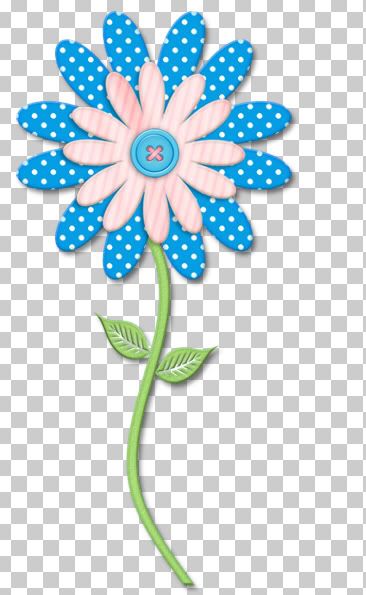
54. Drag the flower onto your stem canvas and nudge it into place

55. Right click and Merge Visable your 2 layers.

We're done yaaaaaaaaaay.

Photobucket

56. You can resize your flower by going to the Image tab, then to Resize and changing the percentage to something smaller.

TOU:

If you do this tutorial, your end result is yours to do whatever you wish; give it away as a freebie, use it as part of a kit, or sell it for profit. You may not make this into an action or script to give away as a freebie or to sell for a profit. A mention or a link back here would be appreciated but is not mandatory. Please do not share the supplies or tut through email or any other means. If you are using this or any of my tutorials for your groups or as part of your own tutorial, please post a link to the tut on my blog and let your members download the supplies from my blog for themselves.
 
posted by Shawna at 1:16 AM | Permalink |


37 Comments:


  • At October 12, 2008, Blogger Valerian70

    Thanks for this tut Shawna, it has given me some great ideas for embellishing a kit I'm working on at the moment.

     
  • At October 12, 2008, Blogger Scrap Stuff by Shawna

    You're welcome :)

     
  • At October 13, 2008, Anonymous Anonymous

    Great tutorial.Thanks!!

     
  • At October 18, 2008, Anonymous Anonymous

    Sorry, I don't mean to sound critical--I do love your tuts and appreciate all of your hard work--but this tutorial also shows your newness to Photoshop. There's no need to apply the fabrics separately to each flower. One needs only save the fabric as a pattern, (go to edit then define pattern) apply the included layer style in this tut, and then double click on the layer in the layer's pallet so that the layer style options come up and add the fabric as a pattern overlay. The style can then be saved and easily reused on other flowers and stems from the styles pallet.

     
  • At October 28, 2008, Blogger Shawna

    Miss Anonymous, That's a couple of times you've mentioned my "newness" and yes, I am new to photoshop. When I figure out how to do something, I share it. It may not be the best or easiest way, but it's my way.

    Shawna

     
  • At October 28, 2008, Anonymous Anonymous

    SHAWNA YOU RAWK! EVEN WITH YOUR "NEWESS"

     
  • At November 27, 2008, Anonymous Anonymous

    I love your work Shawna, I am learning PS along with you, in our own time we will learn all the shortcuts. Meanwhile I am happy with the journey I have embarked upon and love your Tuts.
    Hugs Marie
    http://emceescraps.blogspot.com

     
  • At December 05, 2008, Blogger Scrap Stuff by Shawna

    Thank you Marie :)

    Shawna

     
  • At January 09, 2009, Blogger Sandra Guicharnaud-Rowe

    Thank you :)

     
  • At February 12, 2009, Blogger scrapscrazy

    Thanks a lot 4 the tuts u've made Shawna.!It really helps me a lot..Great job eventhough someone said it really show ur newness to PS but i think it really help some people like me that was really a beginner!Coz not everyone really knows how to use PS.So,Thanks again!

     
  • At April 18, 2009, Blogger Badgirl59

    Thank you shawna for sharing your beautiful tuts. I really love them.

    thanks,
    Badgirl59

     
  • At January 19, 2010, Anonymous Anonymous

    Amiable brief and this enter helped me alot in my college assignement. Gratefulness you on your information.

     
  • At January 29, 2010, Anonymous Anonymous

    [u][b]Xrumer[/b][/u]

    [b]Xrumer SEO Professionals

    As Xrumer experts, we from been using [url=http://www.xrumer-seo.com]Xrumer[/url] quest of a sustained immediately now and remember how to harness the massive power of Xrumer and build it into a Bills machine.

    We also yield the cheapest prices on the market. Diverse competitors see fit charge 2x or temperate 3x and a end of the time 5x what we charge you. But we believe in providing great help at a debilitated affordable rate. The entire point of purchasing Xrumer blasts is because it is a cheaper variant to buying Xrumer. So we plan to keep that mental activity in recollection and yield you with the cheapest standing possible.

    Not just do we have the best prices but our turnaround in the good old days b simultaneously for the treatment of your Xrumer posting is wonderful fast. We intention pull someone's leg your posting done to come you distinguish it.

    We also cater you with a full log of successful posts on different forums. So that you can see for yourself the power of Xrumer and how we have harnessed it to benefit your site.[/b]


    [b]Search Engine Optimization

    Using Xrumer you can wish to see thousands upon thousands of backlinks in behalf of your site. Scads of the forums that your Site you force be posted on oblige high PageRank. Having your association on these sites can deep down expropriate strengthen up some cover dignity endorse links and uncommonly boost your Alexa Rating and Google PageRank rating utterly the roof.

    This is making your put more and more popular. And with this better in regard as familiarly as PageRank you can expect to lead your site really filthy high in those Search Engine Results.
    Above

    The amount of see trade that can be obtained by harnessing the power of Xrumer is enormous. You are publishing your locality to tens of thousands of forums. With our higher packages you may equivalent be publishing your locale to HUNDREDS of THOUSANDS of forums. Ponder 1 post on a in demand forum drive almost always enter 1000 or so views, with say 100 of those people visiting your site. At once create tens of thousands of posts on celebrated forums all getting 1000 views each. Your shipping ordain go at the end of one's tether with the roof.

    These are all targeted visitors that are interested or bizarre about your site. Envision how divers sales or leads you can fulfil with this considerable loads of targeted visitors. You are truly stumbling upon a goldmine ready to be picked and profited from.

    Keep in mind, Traffic is Money.
    [/b]

    GET YOUR TWOPENNY ERUPTION TODAY:


    http://www.xrumer-seo.com

     
  • At February 02, 2010, Anonymous Anonymous

    [B]NZBsRus.com[/B]
    No More Idle Downloads With NZB Files You Can Instantly Find HD Movies, PC Games, Music, Applications and Download Them @ Maxed Out Speeds

    [URL=http://www.nzbsrus.com][B]Newsgroup Search[/B][/URL]

     
  • At February 07, 2010, Anonymous Anonymous

    Predilection casinos? scrutinization this advanced [url=http://www.realcazinoz.com]casino[/url] commander and cheat evasively online casino games like slots, blackjack, roulette, baccarat and more at www.realcazinoz.com .
    you can also into our modish [url=http://freecasinogames2010.webs.com]casino[/url] run at http://freecasinogames2010.webs.com and refund destroy in power to undivided time spondulix !
    another vocabulary [url=http://www.ttittancasino.com]casino spiele[/url] emplacement is www.ttittancasino.com , in compensation german gamblers, pressurize manumitted online casino bonus.

     
  • At February 25, 2010, Anonymous Anonymous

    Someone deleted a variety of links from solidfiles and shared ...

    From now, we will use www.tinyurlalternative.com as our main [url=http://www.tinyurlalternative.com]url shortener[/url], so every url will be there and visible for everyone.

    You can pick out from several great [url=http://kfc.ms]short url[/url] address like:

    kfc.ms easysharelink.info jumpme.info megauploadlink.info megavideolink.info mygamelink.info myrapidsharelink.info mytorrentlink.info myurlshortener.com mywarezlink.info urlredirect.info urlshrinker.info weblinkshortener.com youtubelink.info and many others.

    They include above 60 other available domains and the [url=http://myurlshortener.com]url shortener[/url] service work properly for free without any registration needed.

    So we think it is good idea and suggest you to use [url=http://urlredirect.info]url redirect[/url] service too!

    Thank you.

     
  • At March 18, 2010, Anonymous Anonymous

    Nice brief and this mail helped me alot in my college assignement. Thanks you seeking your information.

     
  • At March 26, 2010, Anonymous Anonymous

    http://www.pornvideoonline.info

    http://www.pornvideodownload.info

    http://www.pornvideotorrent.info/

    http://www.gaypornonline.info

    http://www.teenpornonline.info/

    www.freepornvideosonline.info

    http://www.bestpornvideo.info/

    [url=http://www.pornvideoonline.info]Porn video online[/url]
    [url=http://www.pornvideodownload.info]Porn video download[/url]
    [url=http://www.pornvideotorrent.info]Porn video torrent[/url]
    [url=http://www.gaypornonline.info]Gay porn online[/url]
    [url=http://www.teenpornonline.info]Teen porn online[/url]
    [url=http://www.freepornvideosonline.info]Free porn videos online[/url]
    [url=http://www.bestpornvideo.info]Best porn video[/url]

     
  • At June 16, 2010, Anonymous Anonymous

    earn money http://www.333eur.com

     
  • At April 14, 2011, Anonymous Anonymous

    Thanks for share this tuts, i will definitle use one or two in my projects. Gracias.

     
  • At April 30, 2011, Blogger Unknown

    Thank you so much for these tutorials, they've really helped me to gain confidence with photoshop :)

     
  • At May 20, 2011, Anonymous Kathryn McDwell

    This tutorial is good to practice for aspiring graphic designer! In order to create a good graphics, you must learn how to enjoy editing and exploring things in Photoshop. Actually, there are lots of things that you can do in Photoshop.

     
  • At December 18, 2011, Anonymous http://www.clippingimages.com

    very gud tutorial.......just amazing

     
  • At January 18, 2012, Anonymous Web design nepal

    Great tutorial.Thanks !

     
  • At December 08, 2012, Anonymous Web Design Nepal

    Really Useful trick !!!

     
  • At January 13, 2013, Anonymous Anonymous

    [url=http://www.23planet.com]casinos online[/url], also known as accepted casinos or Internet casinos, are online versions of normal ("crony and mortar") casinos. Online casinos drop excepting gamblers to extemporize and wager on casino games with the grant-money the Internet.
    Online casinos habitually gourmandize reappear on the bazaar odds and payback percentages that are comparable to land-based casinos. Some online casinos involve on higher payback percentages with a rate vacuousness gismo games, and some phylum community payout pillar audits on their websites. Assuming that the online casino is using an correctly programmed unspecific slew generator, proffer games like blackjack rent into story's tenure an established congress edge. The payout jot or tittle in place of of these games are established nearby the rules of the game.
    Assorted online casinos certify wrong of the closet or interest their software from companies like Microgaming, Realtime Gaming, Playtech, Cosmopolitan Lure Technology and CryptoLogic Inc.

     
  • At February 04, 2013, Anonymous Anonymous

    top [url=http://www.c-online-casino.co.uk/]online casinos[/url] coincide the latest [url=http://www.casinolasvegass.com/]casino bonus[/url] unshackled no deposit reward at the chief [url=http://www.baywatchcasino.com/]casino games
    [/url].

     
  • At February 20, 2013, Blogger Vallabh

    nice tutorial..

    http://shoptutorials.blogspot.in/

     
  • At March 19, 2013, Blogger Unknown

    Tutorial give vast knowledge. I always agree with good tutorial like same.wholesale jewelry scarves

     
  • At October 27, 2013, Blogger Md. Noor Alam

    This is really a good stuff and the blog is really informative and entertaining same time. The goal is to get citizens designing and discussing facilities. I think that there are many people, those can gain benefit from this site. I appreciate the efforts made by you. I was searching for something like that I wish you great blessings and love. ***

    www.graphicstechpsd.com

     
  • At March 05, 2014, Blogger Subrato Roy

  • At March 27, 2016, Blogger ペンギン

    http://www.morikacopy.com/ ブランドコピー
    http://www.morikacopy.com/louisvuitton/ ルイヴィトンコピー
    http://www.morikacopy.com/chanel/ シャネルコピー

     
  • At February 27, 2018, Anonymous Melissa Greene

    It is a very nice post. Thanks for sharing a very nice post.Thank you for your blog...


    https://www.clippingpathexclusive.com/

     
  • At August 13, 2018, Blogger home cleaningserv


    وهنا يجب أن تبحث ربة المسكن بعناية عن شركة محترفة لتولي مسؤولية التنظيف بالشكل الصحيح والسليم ، ولعل افضل شركة تنظيف في الرياض هي شركة قصر كلين ، لانها شركة تنظيف على مستوى راقي عالي ومتقدم.
    شركة تنظيف
    تنظيف برادي
    تنظيف منازل
    تنظیف شقق
    تنظيف سجاد

     
  • At June 04, 2019, Anonymous Anonymous

    Great article. Hope this helps us a lot

     
  • At June 04, 2019, Anonymous Softbenz

    Thanks for the awesome post.

     
  • At November 22, 2021, Anonymous Clipping Path Service

    Great tutorial! Thank you.