Wednesday, November 26, 2008
Christmas Candles
Photobucket


Supplies: Download Here


1. Open up a 500 by 500 transparent image.

2. Set your forground to black.

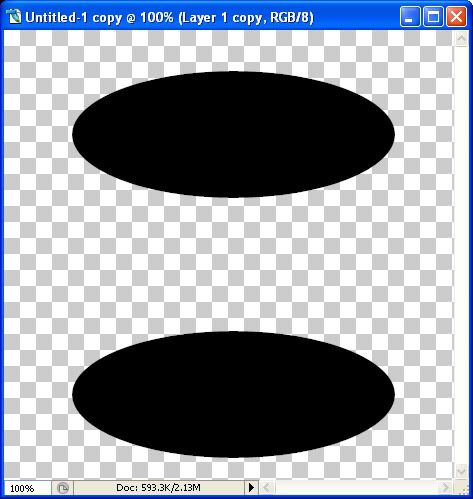
3. Click on your Custom Shapes tool on the left and set it to a basic circle. Drag out an oval for the top of your candle.

Photobucket

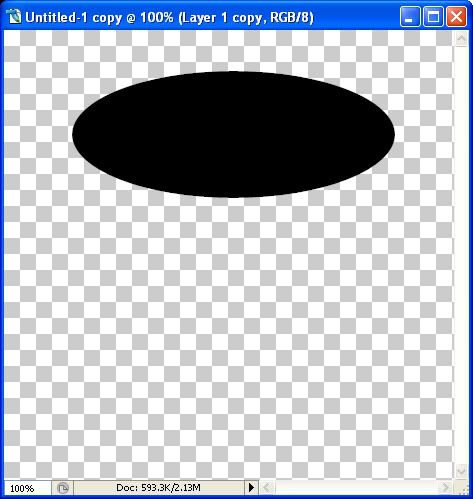
* If you don't have a basic circle, instead, click on your Elliptical Marquee tool and draw out an ellipse, then flood fill it with black. Then deselect from the selections tab.


4. Duplicate this layer by right clicking on it in the layer palette and choose Duplicate Layer. Make sure you are not right clicking on the Icon, but on the layer itself.

5. Click on your Mover tool on the left to activate it, then use your down arrow key on your keyboard to move this second oval to the bottom of your canvas.

Photobucket

6. Click on your Custom Shape tool on the left and set it to a basic rectangle.

* If you don't have a rectangle, use the Rectangular Marquee tool on the left, draw it out, then fill with black and deselect.

7. Create a new layer by going to the Layers tab, choose New, then New Layer.

8. Draw out a rectangularish square that meets both ends of your 2 ovals.

Photobucket

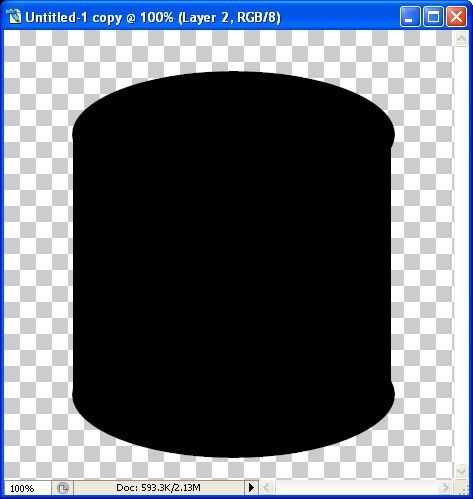
* You'll notice that my square doesn't quite meet the right side of my 2 ovals like it does on the left. If you can't get yours to meet properly, hold down your Ctrl key on your keyboard and hit the t key. This will bring up a bounding box and you can click on the node and pull your square out. This gets tricky sometimes and won't pull to where you want it exactly, so if it goes past the ovals, leave it, and click on your Rectangular Marquee tool, select the portion that is over, then hit the Delete key on your keyboard.

This is what you should have now:

Photobucket

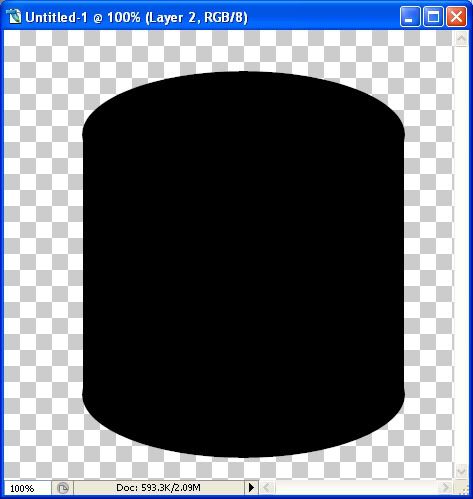
9. Hide the top oval by clicking the eye icon next to it in the layer palette.

10. Right click on one of the 2 remaining layers and Merge Visable.

* Keep the top oval hidden for now.

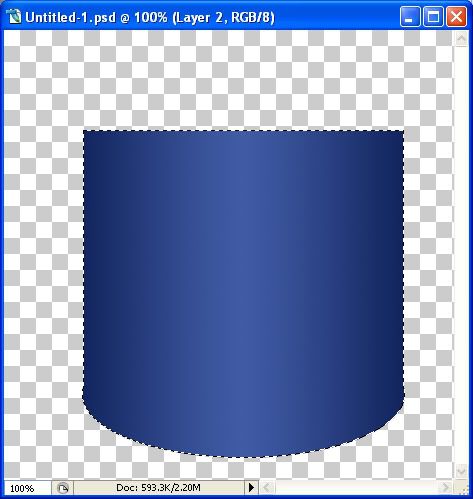
11. Hold down your Ctrl key on your keyboard and click on the ICON of the candle base in the layer palette. You'll get the marching ants all around it.

12. Make a new layer by going up to the Layer tab, over to New, then to Layer. This should be above your black base in the layer palette.

13. Set your foreground to a dark blue 081a50 and your background to a lighter blue 415ba5.

14. Click on your Gradient tool on the left. It may be hidden behind the Paint Bucket tool.

15. Now go up to the top of the screen and you'll see the blue gradient option. Click the down arrow beside it and choose the first gradient called foreground to background. Set the gradient style to Reflected Gradient, Mode is Nornal, Opacity is 100%, Reverse, Dither, and Transparency are all checked.

16. Working on your blank layer, put your cursor in the middle of your black candle base on your canvas, hold down your Shift key, drag left and stop when you get outside the marching ants on your canvas. This is what you should have now:

Photobucket

17. Go up to the Select tab and choose Deselect.

18. In the layer palette, right click on the black candle base layer and choose Delete Layer.

19. Unhide the top oval layer from the palette, hold down your Ctrl key and click on the icon to get the marching ants.

20. Make a new layer above it, ( layer tab, new, layer) and drag this layer to the top of the pile in the palette.

21. Click on your gradient tool and repeat step #16.

22. Deselect that layer from the Select tab.

23. In the layer palette, delete the black oval layer. This is where you should be now:

Photobucket

24. Working on your oval top layer, click on the layer style icon at the bottom of your palette. It looks like a grey circle with and f in the middle. Choose Inner Shadow and use these settings:

blend mode: luminosity, black for colour
opacity: 40%
angle: 120 and global light is checked
distance: 5
choke: 0
size: 35

25. Now click on Inner Glow on the left hand side and use these settings:

blend mode: screen
opacity: 30
noise: 0
colour: 4648bd

Elements:

technique: softer
source: edge
choke: 59
size: 5
and click OK

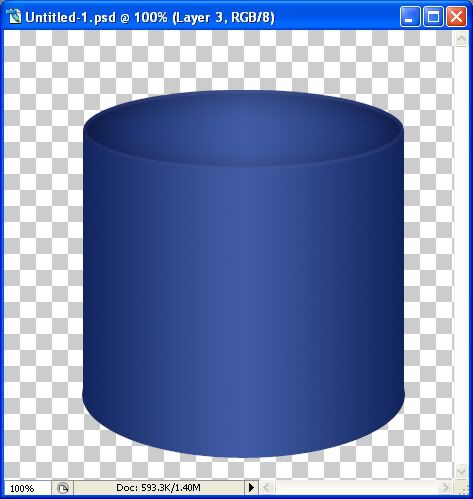
This is how it should look:

Photobucket

* Now, the top oval looks too large so we are going to scale it down a little.

26. In the layer palette, click on the top oval to make it our active layer. Hold down the Ctrl key and then hit the t key on your keyboard. You will get a bounding box with square nodes on it.

Photobucket

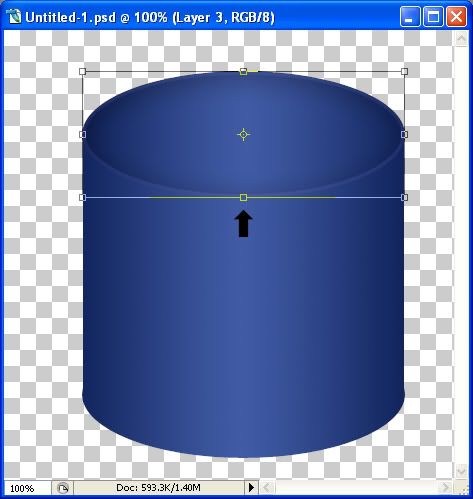
27. Put your cursor on the node indicated by the arrow and drag it upwards untill it looks like the one in the picture below. You may need to drag it down a bit to fit back on your candle properly as well.

Photobucket

28. Make a new blank layer and drag it in between the top and candle base layers.

29. Set your foreground to white, and click on your Brush tool on the left, and set it to Soft Round 17 pixels.

30. Hold down your Ctrl key and click on the icon of the blue candle base layer in the palette. You'll have your marching ants around your candle base, but make sure the blank layer is the highlighted layer in the palette.

31. Hold down your Shift key and drag out a straight line with your brush from top to bottom in the middle of your candle.

32. Next, go up to the Filter tab, down to Blur, then to Gaussian Blur and set the Radius to 20.5 and click OK.

Photobucket

33. Open up SK Wick from the supplies folder, resize it in proportion to your candle (about 50%) and place it in the middle of your candle.

34. Click on your Eraser tool on the left, brush size about 13 and opacity around 16% and click once or twice around the bottom portion of the wick, till it's a little see through.
35. Use your paint brush to paint a little bit of blue over the bottom portion of the wick so it looks like it's blended into the candle itself. Do this on a new layer. You may want to try lowering the opacity of the paint layer a little.

36. Open up SK Flame from the supplies folder. With your Mover tool, drag it over onto the top of the wick.

37. Right click on one of the layers in the palette and Merge Visable.

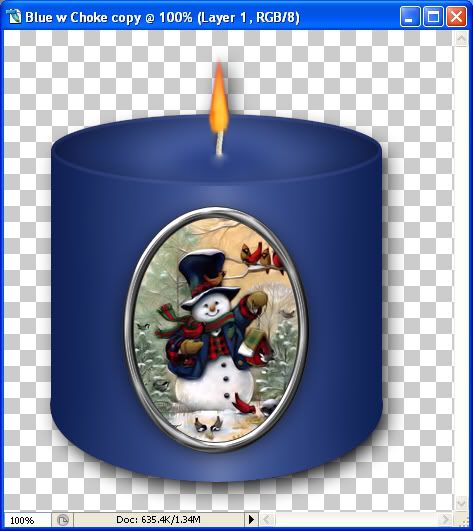
38. Make a new layer and decorate with brushes, wordart, tubes, ect......

Photobucket

TOU:

If you do this tutorial, your end result is yours to do whatever you wish; give it away as a freebie, use it as part of a kit, or sell it for profit. You may not make this into an action or script to give away as a freebie or to sell for a profit. A mention or a link back here would be appreciated but is not mandatory. Please do not share the supplies or tut through email or any other means. If you are using this or any of my tutorials for your groups or as part of your own tutorial, please post a link to the tut on my blog and let your members download the supplies from my blog for themselves.
 
posted by Shawna at 3:34 PM | Permalink | 10 comments
Christmas Ball
Photobucket

Supplies: Download Here

** It is important that you DO NOT resize the ball template before you do this tutorial because we will be applying layer styles, and it will not turn out looking the same if resize beforehand. You can resize it after it is finished.


1. Open up SK Ball Template from the supplies zip.

2. Go up to the Image tab and choose Duplicate, click OK from the popup then close out your original Ball Template.

3. Add a new layer by going to the Layer tab at the top and click New, then Layer.

4. Set your foreground colour to 800000.

5. Click on your Paint Bucket tool on the left and fill your new layer with the red colour.

* Now we are going to use a very simple clipping mask to merge the red colour onto our round shape.

6. Hold down your Ctrl and the Alt key on your keyboard, and then hit the g key.

* You should now have a solid red circle on your canvas. And your layer palette should look like this.

Photobucket

7. Click once on the red layer to make it the active layer and then change the Blend Mode to Colour.

Photobucket

* This is what yours should look like now. Kind of a metalic rose colour.

Photobucket

8. Right click on one of the layers and from the flyout choose Merge Visable. Make sure not to right click on the icon, click on the layer itself.


* Some other time when doing this tut again, you can experiment by following these next 3 steps to give you different results.
~~~
Create a new layer above the merged layer ( Layer tab, New, then Layer) and fill it with the same red colour as before.
Create a Clipping Mask by holding down your Ctrl and Alt key and hitting the g on your keyboard.
Change the Blend Mode this time to Overlay, Lighten, or Soft Light, then merge visable. Experiment and see what looks good.
~~~


9. Hold down your Ctrl key and click once on the ICON of the merged ball in the layer palette.

* This creates a selection around your image and you should have marching ants all around your ball.

10. Duplicate this image by right clicking on the layer in the layer palette and choosing Duplicate Layer and click yes when you get the popup.

* You should now have 2 layers exactly the same in the layer palette.

11. Go up to the Filter tab at the top and down to Blur, then over to Gaussian Blur. In the Radius section, type in 20.00 and click OK.

12. Go up to the Select tab and choose Deselect. This is what you should have so far:

Photobucket

* Now it needs a bit of shading so we are going to add a layer style to the outter edges. Make sure the top duplicated copy is highlighted blue in your layer palette. Click it once if it isn't.

13. At the bottom of your layer palette, you will see an icon that looks like a grey circle with an f in the middle. Click on that, and from the flyout click on Inner Shadow. Change your settings to the same as in the picture below:

Photobucket

* Yours should now look like this:

Photobucket

14. In the layers palette, right click on one of the layers and choose Merge Visable.

* Now we are going to put a second burn on it.

15. Click the layer styles icon again at the bottom of the layer palette and choose Inner Shadow. Use the settings below:

Photobucket

* This is what yours should look like now:

Photobucket

16. Make a blank layer by going up to the Layer tab, then to New, then over to Layer and click OK at the popup.

17. Right click on one of the layers and choose Merge Visable.

* You'll notice that there was a little layer styles icon at the end of your ball layer but it is now gone. That's what merging the ball layer with the blank layer did.

18. You may need to expand your canvas in order to have enough room to put the topper on it, so go up to the Image tab and down to Canvas Size. In the New Size section, click the down arrow to the right of the Width and choose pixels. Change the Height to 650 pixels and click OK.

19. Open up SK Topper 01 from the supplies folder and use your Mover tool to drag it onto the top of your ball.

20. When it is placed where you want it, righth click on one of the layers and Merge Visable.

TOU:

If you do this tutorial, your end result is yours to do whatever you wish; give it away as a freebie, use it as part of a kit, or sell it for profit. You may not make this into an action or script to give away as a freebie or to sell for a profit. A mention or a link back here would be appreciated but is not mandatory. Please do not share the supplies or tut through email or any other means. If you are using this or any of my tutorials for your groups or as part of your own tutorial, please post a link to the tut on my blog and let your members download the supplies from my blog for themselves.
 
posted by Shawna at 3:17 PM | Permalink | 8 comments
Rainbow
Photobucket

Supplies: Download Here


1. Open up SK Greyscaled Strip from the supplies zip.

* You can use mine or you can use a swatch of your own, whether it is plain paper or a pattern, or several patterns. Just make the strip size somehwere around 1800 by 140.
2. Make as many duplicate copies of this strip for as many colours you want in your rainbow. 5 is usually a good number to have. Image tab, then to Duplicate, make 5 copies then colse out the original.

3. Next, we need to recolour them. Go up to the Layer tab, and down to New Adjustment Layer, then to Hue/Saturation and click ok.

4. Put a checkmark beside Colourize and if it's not there already, put one in Preview too so you can see the colour change to your image before you make a final decision.

5. Now, just move the sliders up and down untill you get a colour that your satisfied with.
6. Right click on one of the two layers in the layer palette and Merge Visable.

* Repeat this step on all of your strips. Here's what I chose:

Photobucket

7. Choose one of the strips to start working with and minimize all the others.

8. We need to select our entire image, so to do this you would hold down your Ctrl key on your keyboard and click once on the ICON of your strip in the layer palette.

9. Now we're going to contract the selection, so go up to the Select tab, then to Modify, then to Contract and put a 6 in there. Make it an even number or when you paste it back in, you will have a space.

10. Now go up to the Edit tab, and select Cut, then back to the Edit tab and select Paste.

* If needed, use the arrow keys on your keyboard to nudge your selection back into it's place.

11. Do this on each of your coloured strips.

12. Now, choose one of your strips to work on, i'm using the purple one, and make sure in the layer palette that the inner portion of the ribbon is highlighted and active.

13. Go down to the bottom of your layer palette and click on the Layer Style icon. It is the grey circle with the f in it. And then click on Inner Shadow and use the picture below for your settings:

Photobucket

Here's what mine looks like now:

Photobucket

14. You need to have the same layer style on each of your strips, but you don't have to keep going through the layer styles and doing it manually. On the first strip you put your layer style on, in the layer palette, right click on the icon at the end of your layer and choose Copy Layer Style.

15. Choose another of your strips, right click on the bigger inner ribbon and choose Paste Layer Style. Do this for each of your strips, and after copying the layer style, right click on one of the layers and choose Merge Visable.

16. Now we need a bigger canvas to place all our strips on, so open up an 1800 by 1800 transparent canvas.

17. Click on your Mover tool from the tool bar on the left, then drag each coloured strip onto your new canvas.

* If you want your rainbow colours to be in a specific order.... let's say you want blue on top then pink, then green. You would place the blue one on the bottom of the pile, below the others, then pink, then green ect.....

Here's mine. I had to shrink my pic down to fit on this page, so your image will look a bit different.

Photobucket

18. Once you have them placed, right click on one of the layers in the layer palette and Merge Visable.

* We are going to make this into one big circle using the polar coordinates function. What that is going to do is kind of scrunch and twist these straight lines into a circle and the 2 ends are going to meet with each other. But, we have some extra space on each of our ends and that is going to make a flat 12 pixel line right down the middle of our circle. We need to chop off the ends so that doesn't happen.

19. Click on the Rectangular Marquee tool on the tool bar on the left. Drag out a long rectangle like in the picture below. Make sure you get all of the coloured strips in the marquee rectangle then hit the Delete key on your keyboard and then do the other side:

Photobucket

20. Deselect by going up to the Select tab then to Deselect.

* Now you have a bit of space on the sides where we just cut it away. There can't be any space on either side or the next step won't work properly.
21.

21. Now, go up to the Filter tab, over to Distort, then to Polar Coordinates. Put the green dot in Rectangular to Polar and hit OK.

* You should now have a cute little circle out of your strips. Here's mine resized:

Photobucket

* We need to cut this in half, so grab your Rectangular Marquee tool from the left tool bar. You'll notice that on the top portion of your rainbow circle, you can see where our two ends meet. There's a slight dark line going down the middle of it. Well, we aren't going to use that yucked up part, we are going to use the bottom half which looks perfect.

22. Starting from the top left of your canvas, make a large selection over the top half of your circle and stop when you get to the middle. The part with the selection over it is going to be deleted, so look at the bottom half, which is going to be your actual rainbow and use that as a guide of where you stop your selection.

Photobucket

23. Hit the Delete key on your keyboard to get rid of the upper half, then go to the Select tab at the top and Deselect.

24. Now to flip this right side up, go to the Image tab, down to Rotate Canvas, and choose Flip Canvas Vertical. Here's the final product with a background and some clouds done the same way as the rainbow.

Photobucket

TOU:

If you do this tutorial, your end result is yours to do whatever you wish; give it away as a freebie, use it as part of a kit, or sell it for profit. You may not make this into an action or script to give away as a freebie or to sell for a profit. A mention or a link back here would be appreciated but is not mandatory. Please do not share the supplies or tut through email or any other means. If you are using this or any of my tutorials for your groups or as part of your own tutorial, please post a link to the tut on my blog and let your members download the supplies from my blog for themselves.
 
posted by Shawna at 2:57 PM | Permalink | 30 comments