

These tutorial settings are for the people who have downloaded my Dusty Rose Kit from my freebie blog and would like to make the capitol letters to go with the lowercase ones from that kit. For those using a different colour, in step 2 choose a light colour, and in step 9 choose a darker shade of your original colour.
Supplies Needed:
Gold Sparkle.jpg and font. Both of which you can download HERE.
1. Open up a 500 x 500 transparent image in PS.
2. Set your foreground colour to CA8484.
3. Click on your Text tool and from the dropdown box, choose Christie. Font style is Regular, 100 point, and smooth.
* If you are using a different size, make sure you have extra room at the top, bottom and sides of your letter.
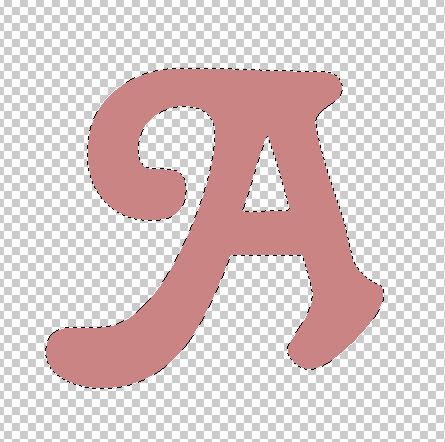
4. Click once on your canvas, type out a letter, and hit enter on your keyboard. (use the mover tool to positioin it in the middle if needed)
5. In the layers palette on the right, right click on your letter layer (not on the icon) and from the flyout choose Rasterize Type.
6. Hold down your Ctrl key on your keyboard and click once on the Icon in the layers palette to select your letter.
* Your letter should now have marching ants all around it.
7. Go up to the Layer tab at the top and choose New and then Layer.
* You should have a blank layer above your letter letter.
8. Working on the blank layer, go up to the Select tab at the top, then down to Feather. From the box that pops up, enter the number 10 and hit OK.
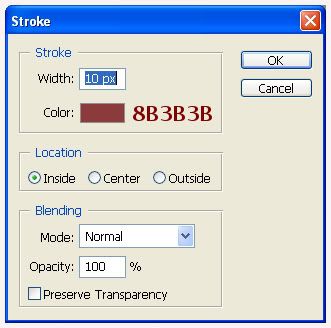
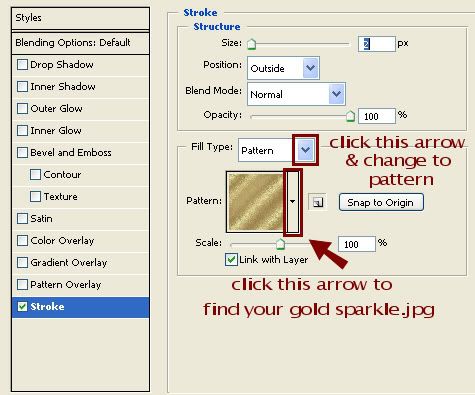
9. Next, go up to the Edit tab, then down to Stroke. Change your settings to the same as the picture below.
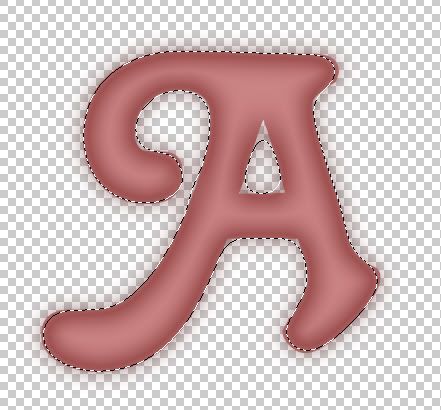
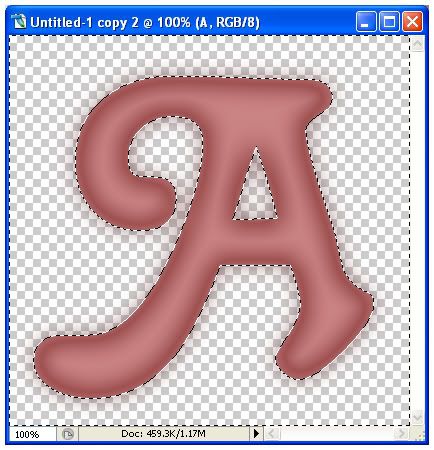
* This is what you should have on your canvas now:
10. Go up to the Image tab at the top, then down to Duplicate and hit OK.
11. In the layer palette on the right, click once on the original letter layer to highlight it, then hold down your Ctrl key on your keyboard and click once on the Icon of the letter.
* Marching ants should now be all around your letter.
12. Now, click once on Layer 1 (the outlined layer) in the layer palette.
13. Go up to the Select tab at the top, and then down to Inverse.
* You should now have marching ants all around your letter as well as all around the border of your canvas like in the picture below:
14. Now hit the Delete key on your keyboard once.
15. Go up to the Select tab at the top, and choose Deselect.
* This is what you should have now:

16. Right click on one of the layers in the palette and choose Merge Visable.
17. Open up gold sparkle.jpg from the zip file.
18. Go to the Edit tab at the top, and from the flyout choose Define Pattern. From the flyout, hit the OK button or give it a name of your choosing and then hit OK.
19. At the bottom of your layer palette, click on the Add a New Layer Style icon ( it looks like a grey circle with the letter f in the middle).
20. From the flyout choose Stroke. Change your settings to the same as the picture below.
* TIP: Before you merge visable your layers, click on the Outlined layer to select it, and in the layers palette, right above your letter icon you will see the word Normal. Click the arrow next to it and change the blend mode and see what you get. I've gotten some nice results with the Mulitpy and Overlay blend modes. Then merge visable your layers when you find something you like.
TOU:
If you do this tutorial, your end result is yours to do whatever you wish; give it away as a freebie, use it as part of a kit, or sell it for profit. You may not make this into an action or script to give away as a freebie or to sell for a profit. A mention or a link back here would be appreciated but is not mandatory. Please do not share the supplies or tut through email or any other means. If you are using this or any of my tutorials for your groups or as part of your own tutorial, please post a link to the tut on my blog and let your members download the supplies from my blog for themselves.


Hi Shawna,
Is there a way to achieve this text appearance in PSP? I'm trying on my system using different bevel settings but so far it's a dismal failure! :-p
Thanks for the awesome info and tuts you provide I'm discovering lots of cool stuff!
Steph