
1. Start out by opening a 300 by 300 transparent image.
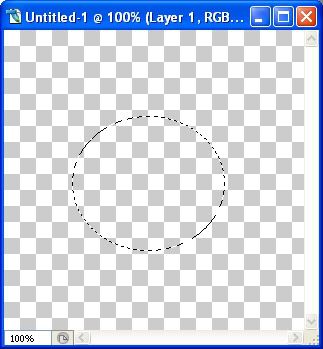
2. Click on your Elliptical Marquee tool on the left. Should be the very first tool in the tool bar.
3. Drag out your M&M shape onto your canvas, about the same size as in the picture below:
4. Set your foreground to C00000 and your background to 800000
5. Click on your Gradient tool on the left. It may be hidden behind the paint bucket tool, so if it is, right click on the paint bucket and click gradient.
6. Up along the top of your screen you will see what's called the gradient editor. It's the long rectangular box that is coloured. Click the down arrow on the right and choose the Foreground to Background preset, which should be the very first one.
7. Now beside the gradient editor, you'll see 5 squares, select the Radial option. Make sure your Opacity is 100 %, Reverse is unchecked, Dither and Transparency are both checked.
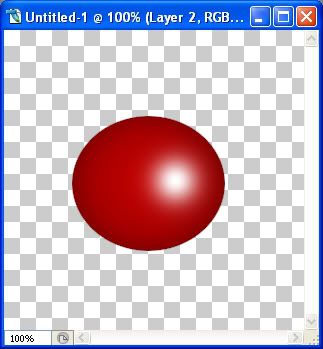
Now we are going to fill our shape with the gradient.
8. Hold down your Shift key, put your cursor in the center of the shape and click and drag from the center upwards, and when you get to just outside the circle, let go. This is what you should have now:

9. Go up to the Select tab at the top and choose Deselect.
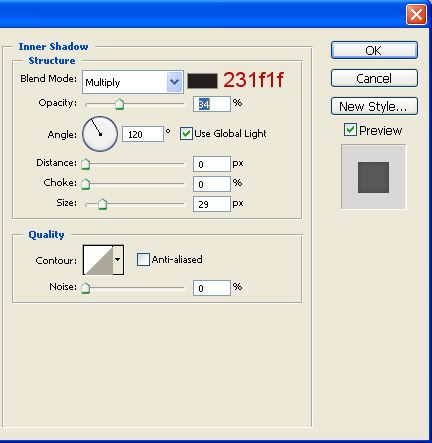
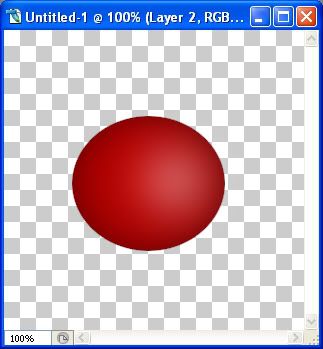
10. At the bottom of your Layer Palette, you will see the Add a Layer Style icon, it looks like a grey circle with an f in the middle. Click on that and from the flyout choose Inner Shadow and use these settings:
This is what yours should look like now:

11. Add a new layer by going up to the Layers tab at the top, then choose New, then Layer.
12. Change your foreground to white (ffffff).
13. Click on your Brush tool on the left. If your brush tool isn't showing, right click the icon and choose Brush Tool.
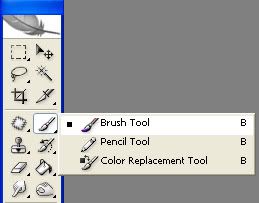
14. Up at the top left of your screen you'll see the word Brush. Click the down arrow next to it and scroll through your brushes untill you find the one called Soft Round 65 pixels, and double click to select it.
15. Click once with your brush, near the center but off to the right a little. See picture below:
* Make sure that the white brush does is not too big. It should be small enough that it has space all around it and it's not close to the top, bottom or side. We are going to blur it and we don't want the white blur going outside of the M&M.
Now we are going to blur it a bit.
16. Go up to the Filter menu and choose Blur then Gaussian Blur. Set the Radius to about 23 and click OK.
This is what mine looks like now
17. Add a new layer by going up to the Layers tab, then to New, then to Layer.
18. Click on your Text tool on the left. From the font scroll menu, find Arial Black and select it. Set the size to 11-14.
* You may need to adjust the size of the font depending on the size of your M&M.
19. Click once in the middle of your M&M, and type out a small m.
20. Don't worry if it's not centered right now. If it's a good size and looks ok, then hit your enter key on your keyboard to accept it.
21. Click on your Mover tool on the left and with your cursor, move it into place if needed.
* You can use your arrow keys on your keyboard to nudge it one pixel at a time, but you must have your Mover tool selected to do that.
22. In the layer palette, above your "m" layer, to the right you will see Opacity. Change it from 100 to about 75.
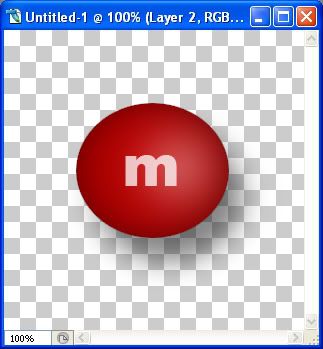
23. If everything looks good, right click on one of the layers and choose Merge Visable.
Here's what mine ended up looking like:
TOU:
If you do this tutorial, your end result is yours to do whatever you wish; give it away as a freebie, use it as part of a kit, or sell it for profit. You may not make this into an action or script to give away as a freebie or to sell for a profit. A mention or a link back here would be appreciated but is not mandatory. Please do not share the supplies or tut through email or any other means. If you are using this or any of my tutorials for your groups or as part of your own tutorial, please post a link to the tut on my blog and let your members download the supplies from my blog for themselves.